True beauty lies within our hearts, our health and our passions. My passions include knitting, promoting wellness and being amidst the company of beautifully authentic people.


Tuesday, November 13, 2012

DIY T-Shirt Repurposing Project


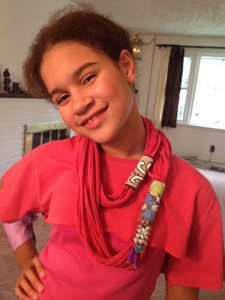
As I embellished my neck with my creatively funky scarf made from a $2.50 t-shirt this morning, I warmly reflect of the great time I had making it with my friend Lyse's 3 children.


Old T-shirts undoubtedly make the best rags for cleaning your home or car, but can also be repurposed a number of ways by means of fun DIY projects which can be found via the Internet. They can made into cool accessories such as bracelets, headbands, bags or scarves. Repurposed Tees can also be used to make floor rugs, pillows and my personal favorite, YARN for knit or crochet projects! Surprisingly, many of these projects do not require a sewing machine, rather a lil' dab of glue or tacking with a needle and thread here and there.

For our t-shirt scarves, we used the following:

Old T-Shirts* (I found new ones at a 2 for $5 sale)
A sharp pair of scissors
Glue Gun & Glue Sticks
Needle & Thread
A long ruler
A pencil or white fabric chalk
Embellishments: costume jewelry pieces (e.g., earrings/pendants), buttons, beads, gems, stitch markers, scrap fabric or leather

*It is important to note that some t-shirts have seams that run down the sides.  It is best not to use these types.  The only seams should be those found at the neck, arms and bottom hem.  Also keep in mind that the larger the t-shirt, the longer the scarf.  We used size Large for the scarves the children made, and size XL for mine.

We first begin by laying the t-shirt flat and cutting the t-shirt at just under the armpit straight across (from one armpit to the other).  This forms a tube.

Next, we cut the bottom hem off of the tube we've just created and smooth out the t-shirt tube flat with your hand. 

Using a pencil or fabric chalk, mark 1" stripes across the width of the tube. 

Once these 1" lines have been made, carefully and slowly cut on the lines you have made to form 1" strips.  Be sure both layers of the t-shirt remain together and flat so as to have uniform strips.  This part can be a bit tricky.
You should have a bunch of strips that resemble loops like these:


To make these loopy strips curl into tubes, gently tug on them (as if stretching a rubber band) and the strips will curl up into tube-like strands.  Once you have stretched all of your loops, you can gather them up together and begin embellishing them.  If you'd like to make a multi-colored scarf from different colored loops, now's the time to do it.

We chose to use the graphics found on one of the t-shirts to decorate two of the others.  Cut out a square, measure the circumference of the loops you wish to wrap around and tack it close with your glue gun, or sew it, which ever is easiest for you.  Next, with a needle and thread, you can sew on buttons, jewelry pieces, beads, etc.


Now ROCK OUT and jazz up your wardrobe with your funky new accessory!

To store your scarf, it is best to twist it similar to that of a hank of yarn. 


So before throwing away that old t-shirt...you may want to think again.  Happy crafting & Enjoy!

Wednesday, September 12, 2012

To Frog Or Not To Frog...That is the Question!

Oh don't mind the bottles of booze in the background, they are merely remnants from the aftermath of an impromptu 'Cuzins Nite Out' at our place the Saturday evening before, and since the crowd dispersed close to 5 am the following morning, there was no rush to clean up.

Fast forward to Sunday around Noon,  I get the urge to start yet another crochet shawl called Small Talk, designed by Cheri McEwen.  I had just completed my first Small Talk earlier in the week and liked the pattern so much but wanted one in a much lighter weight yarn, in one of my favorite colors, ORANGE. (The above links are  links within Ravelry, an on-line community for knitters and crocheters, so if you're not a member, you may not be able to take a peek.  To become a member, just go to www.Ravelry.com so you can become hooked on Ravelry like me!)

I'm aware, I have no business beginning yet another project when I have so many WIPs, but I eagerly dig into the lonely stash bin (don't start laughing Lyse) and I find this tonal yarn by KnitPicks called Stroll, in the color Foilage.  Ohhhh, perfect, Yes?  Hold on just a moment.  The yarn is a perfect collage of colors found of a warm sunset or September's autumn leaves, so I begin to wind the yarn from hanks into skeins with my handy dandy new table top swift gifted to me by Petra, a swap buddy from Germany.  Shortly thereafter, with hook in hand I am ready to begin.

The first thing I notice immediately is how well the gentle pooling of colors compliment one another, it reminded me of a tree I once saw in Maine during the fall season some years ago that was so orangey-red, it appeared to be on fire.  This tree may very well be responsible for my love affair with the color orange.

Next, I notice that the wool had a very rustic feel, which was ok...so I tink to myself (pun intended, lol)...after all, I'm a rustic kind of chick, right?  But do I want such a feel in a shawl?   I work a few more rows and now the shawl appears quite woolly...oh dear, what's happening to my dream shawl?   Hence the thought process begins, and I have a serious talk with this tadpole...shawlie, shawlie, will I like you once you're done?  Or, will I gift you away just like all the others?  Should I Frog you now before you grow too big?   I decide to sleep on it over night, and in my dreams I envision my new shawl leaping into the frog pond, oh noooooo!  Come baaaaaack!

Realizing that the possibilities are endless, that this wool could very well 'thin out' and become quite light and airy with a drop of  fabric softener and some hard blocking, I remain hopeful...but who can tell?  Have you used this wool for shawls before?  What was the result?  Does it lose the woolly look/feel?

For the non-crafters totally lost in the lingo, here is a list of some fun-ky vocabulary words used within this post borrowed from Ravelry's Glossary of Jargons and Acronyms, common to knitters and crocheters.

Frog [frog; frawg; frogging] verb, adjective:  To rip back (for the sound “rip it, rip it”) by removing the needles from the project and pulling on the loose end of the yarn; also applies to crochet. Generally used when mistake is found below the row you are currently working, or when completely undoing an entire project or piece. (see Tink)
Frog Pond [frog pond] noun: a storage place for knitted and crocheted things waiting to be frogged

Tink [Tink] verb: To undo knitted stitches by reversing the knitting motion, effectively un-knitting the stitch. Used when fixing an error on the same row you are knitting. (“tink” is “knit” spelled backwards) (see also Frogging)
TOAD [Toad; Towed] noun: Trashed Object Abandoned in Disgust

WIP [WIP; Whip; {Acronym}] noun: Work In Progress

I'm really trying to be a good girl and knit from my stash instead of buying even more yarn, but its tempting. What say you my fellow crafters?  Should this tadpole's life be saved? 

Wednesday, September 5, 2012

Camping Trip To Niagara Falls - Take #3

We begin our fourth day at the Niagara Gorge Discovery Center where we learned all sorts of fun facts about the Gorge, when and how it was formed and the types of rock found at different levels within the gorge.

As I reflect back on the week, the thought of all of the friendly people we encountered during this trip warms my heart.  From the camper who offered us 5 Hershey Bars to make up for the 2 we left behind at home in the fridge so that we could make S'mores, and the couple who shared half a watermelon with us and left us the world's largest roll of paper towel as they were packing up to return home, and the two school teacher moms who supplied us with ice cold beers and live worms when Mike supplied four of their children with Ghana style fishing rods similar to Skylar's later invited us over for more S'mores, and how could we forget the dad with 4 children from Mississippi who asked if he could use our campfire to make MORE S'MORES, LOL, and our favorites...Rob and Dottie along with their two chihuahuas who gave us a tour of their beautiful RV home.  Dottie is a fellow crafter and bestowed upon me some beautiful gifts of yarn, fabric and batting for quilting, RV magazines and a series of books for reading!  Dottie, you spoil me, MWUAH!

Notice the 100 step staircase (106 steps according to Mekhi) ...my nutty children ran up then and back down again

Observation Deck from the Skylon Tower

Devil's Hole State Park


Nasty, Nasty Children

So, the verdict is in...the view of the falls is far better from the Canadian side.  This was partly due to the vantage point from which we were able to physically stand, both to view and photograph the Horseshoe Falls, American Falls and Bridal Veil Falls while on the Canadian side.  The view from Canada is a much more panoramic view, were as on the U.S. side we felt our view was limited to a specific angle depending on what we wanted to photograph...it was as if we could never get close enough to get a shot that would capture it all.  However, while on the U.S. side we had no clue as to what we were missing...until we crossed the Rainbow Bridge, and then the border...whoa! 

Canada is beauuuutiful!  Aside from the cleanliness of Niagara Falls, the ambiance of this Southern Ontario city is almost magical at nightfall and reminded us of our first Disney experience.  There are high rise hotels, casinos and floral gardens that would make Martha Stewart jealous!  Clifton Hill is a street that is jam packed with excitement, reminding us of our very own Times Square, only much more compact and cleaner.  Then at 8pm the light show begins.  Talk about spectacular!  Strangely enough, I wasn't able to capture the photos from the light show, they simply didn't photograph well, but to the naked eye the rainbow of colors is truly a sight to see.


Niagara Falls, Canada

Green Lights

Yellow Lights

Purple Lights
Next stop...The Niagara Falls Aquarium!

Noooo, we can't take him home!

Mekhi makes friends with a Penguin

There is so much more to see, so when we return we'll have another adventurous itinerary lined up.  From a short distance we could the Whirlpool Aero Car, which travels across the rapids in an antique cable car, we also walked past Journey Behind the Falls which allows you to travel through a tunnel behind the falls.  There is also a Botanical Gardens, Marine Land and on the way back across the border we bypassed Bird Kingdom...the list of things to do in the mighty Niagara Falls is endless.


Camping Trip To Niagara Falls - Take #2


The highlight of Day 3 was a visit to the Niagara Falls State Park.  The grounds were simply beautiful and provided a constant refreshing mist from the falls.  Sometimes the mist was very light, and at times it was umbrella worthy.  Whenever the mist arrived, it was always welcomed since the sun was very hot.  The attractions at the park blew us away...literally. 


Notice how the ladies are always ready for a photo opp? 

Cave of the Winds is an awe-inspiring experience, simply put.  Tour takers are given a pair of water shoes and a yellow poncho...no, the shoes aren't the cutest, but they're not optional either.  They could make nifty souvenirs I suppose.  I happened to note they carried shoes up to size 17!!!   Next, we entered an elevator that lowered us 175 feet deep into the gorge...Yikes.   Then there's the hike, first down, down, down on a winding staircase alongside the  falls, then up, up, up.  The higher we climbed, the more soaked we became.   Be careful though, there's all kind of moss growing on the steps and the handrails, so its quite slippery when wet.   And you could forget about carrying on a conversation.  The waterfall is quite noisy, powerful, and amazing!


Mekhi, Mike & Skylar on the Hurricane Deck

Feeling the mist already
Next up was a ride on the Maid of the Mist, an unforgettable boat ride, not to mention the oldest attraction in the country (since the 1800's).  We were given yet another souvenir poncho, yay!  As we entered the boat I wondered how'd I be able to take photos without ruining my iPhone, our only source of photo taking.

This attraction really packs in the 'WOW' by providing picturesque views that simply can't be captured on film.  As the boat enters the mouth of horseshoe falls I think about how appreciative I am of our captain's skill and expertise at calculating the water's current and knowing just how close to the edge is safe (or not) and then knowing when to turn the darn boat around.  I clutched my pearls a number of times on this one.  My poor iPhone, forgive me for exposing you to such levels of danger, LOL!


We survived Maid of the Midst


Rainbows are plentiful throughout Niagara Falls


Top o' the rock


Just a moment while I take all of this in...


Up next...viewing the falls from Canada.  So many have said that you haven't seen the falls until you've seen them from the Canadian side.  We decide to see for ourselves and decide to cross the border on day 4 of our trip...

Tuesday, September 4, 2012

Camping Trip To Niagara Falls - Take #1


I have many fond memories while camping as a child with my family.  We went every year, and sometimes twice a year.  We typically would camp in tent and sleep on cots or air mattresses along with our sleeping bags, and we have tried cabin camping as well during colder seasons.  Camping is sooo much fun, but it can be lots of hard work too depending on whether you're the child tagging along with your family or if you're the adult organizing the activity.  We set out to camp at the Four Mile Creek Campground located 15 minutes from Niagara Falls which is approximately a 7.5 hour drive from where we live.  Mike drove the distance despite my readiness to take over the wheel, whew!  Along the way, we made a few stops for lunch, two bathroom breaks and gas.   It was a pretty straight path, but thankfully we arrived to our destination without incident at 4:30pm.


Immediately taking advantage of daylight, we set up our tent and quickly begin to prepare dinner.

All Hands On Deck!


Our condominium for the week


During the course of the week, all of our meals were quite yummy and primarily featured a starch of either potatoes or rice, a vegetable and fish based stew and a salad.

Salmon Stew & Rice
Salad

Tilapia Stew & Blue Potatoes

After dinner we wash our dishes and walk over less than 100 feet to view Lake Ontario and the beautiful sunset while listening to the waves crashing in on the shore.  It was so peaceful.

Mike at Lake Ontario


The bathhouse and restrooms were less than 40 feet away, so before retiring for the evening we showered and then jumped into our sleeping bags.

Shower House/Laundry Station
Shhhhh!  They're all asleep...Zzzzzzzzzz!

This is the best time of year to go camping in my opinion.  Temperatures were quite warm during the day ranging between High 70's to 86 degrees and up, and would typically fall to high 60's in the evening, and even lower in the mornings...Brrrrrrrr!  For the cool nights and even cooler mornings our thermals and layers of clothing came in handy, and by 11am we quickly traded them in for shorts!

Breakfast was pretty much individualized, some mornings it was smoothies (yes, I brought my Vitamix!  Whaaaat???  LOL), toast and hot cocoa or tea,  hot or cold cereals, waffles, melons, etc.   Surprisingly we weren't too fussy about what to eat for lunch, since time often passed us by.  However, we had loads of snacks to help keep hunger at bay, such as nuts, nut butters and rice cakes, dried papaya, Lara Bars, hand fruit, sweet potato chips, etc.
 
Waffles anyone?


On days 2 and 3 we decide to relax and stay local, enjoying the beautiful scenery of the campground.  The boys (father n' son) decided to go fishing. Dilemma: we were 2 fishing rods short, as Mike only thought to bring 2 rods, one for himself, and the other for Mekhi. Hmmmm, I guess girls don't fish?!!

While the boys decide to walk over to Lake Ontario's edge, back at the campsite Skylar and I begin to make the boys some lunch, after all, this is what girls are good at, right?  Hmph!   Once we're done, we venture over to where the boys are and sit on the huge boulder rocks at the shore's edge to eat.

It's at this time that Skylar decides she'd like to fish, so naturally her dad makes her a fishing rod from a long branch and adds some recycled fishing line he finds caught up in a nearby bush. He adds a small weight, a flotation device, small hook and worm and offers a story or two about how he used this very same type of rod to fish with as a boy growing up in Ghana...viola! Skylar's in business with her new fishing rod from nature.

As it turns out, this is no ordinary fishing rod.  Over the course of the next couple of hours, Skylar catches not just one, but 7 fish!!!  She was the only one who caught fish this trip...we're still scratching our heads over this.

I remained hopeful for the 7 lil' Blue Gills return to Lake Ontario, so I kept them in water while she continues to fish.  When I suggest that she throw them back since they were so small, she firmly protested saying, "Noooo, I caught them and I wanna eat 'em!"  Oh dear.  Her dad was more than happy to carry out her wishes and proceeded to clean them by the lake and we bring them back to our frying pan campsite.


Skylar's first catch...its a Blue Gill!

A congratulatory hug from Big Brother Mekhi


"Wanna know my secret?  I prayed..."
Dinner...courtesy of Skylar!


And now, time for desert...

Naturally, Its all about the S'mores


Stay Tuned for amazing photos of the falls, first from the New York side, and then from the Canadian side.  Sooooo exciting...promise!